How to Record a Game Video
How to Make a Video of Your Game Playthrough
How to Record a Game Video
This tutorial deals with how you can make a video recording of your game-playing session, either for personal viewing, for display on a website that you have created, or even for uploading to a video sharing site like YouTube. You will do so using a computer program called OBS, or Open Broadcaster Software, one of the many free screen recording programs around.
Obtaining and Installing OBS
Go to the OBS website and download the OBS Studio for your system. There are versions for Windows, Mac OS X and Linux.
If you use Windows, doubleclick the installation program that you have downloaded (ie, click the mouse button twice in quick succession while its pointer is hovering over the program installer's icon). Mac OS X users should install the program the usual way. I don't have a Mac, so I can't help you there. And, of course, if you are a Linux user, you probably don't need me telling you how to install a program.
Windows users may get a message from the setup program saying, "Your system is missing runtime components that OBS Studio requires". If so, click the "Yes" button in response to the message. The installer will open your web browser and send you to a page with links to those missing components. Click those links to download the software. Note that if you run a 64-bit version of Windows, there will be two links, and you will have to download and install both those programs. Installation of these is straightforward, since there are no choices to be made. It's just a matter of agreeing to the terms and conditions from Microsoft, and clicking "Install".
Once you finish installing the Visual Studio runtime components, doubleclick the OBS Studio installer again. (It aborted the previous attempt because it needed those components to be installed first.)
If you use Windows, allow the OBS setup program to install to its default location and accept the components that it selects by default. If you have a Realsense camera (whatever that is), and you want to be able to record from them, you may have to put a tick in the "Realsense Source" checkbox when the "Choose Components" screen appears, otherwise you can just accept the default selection. When you are done, the installer will deposit an icon labelled "OBS Studio" on your desktop.
Starting OBS for the First Time
Start up OBS Studio. The first time you do so, you may be asked whether you want to let the Auto-Configuration Wizard configure the software for you. Click "Yes".
The wizard will ask whether you want to optimize for streaming or recording. If you are just recording videos on your computer, and then later uploading them to either your website or a video sharing site (like YouTube), choose "Optimize just for recording, I will not be streaming." Note that this is what I chose for my own setup. (If you are not sure what streaming is, it probably means that you only want to record. In that case, choose to optimize for recording.)
In the Video Settings screen, you will be given a default setting for the "Base (Canvas) Resolution". This is set to the screen resolution of your monitor. You should probably leave this alone, unless the program got it wrong.
Although the FPS field is set to "Either 60 or 30, but prefer 60 when possible", I selected "30" from the drop-down box for my system. Recording games is a very computing-intensive procedure, and if your computer is not fast enough, a higher frame rate will lead to problems (eg, the game and/or the recording program may not be able to keep up, and may even crash). For the type of games that I play, 30 frames per second is enough to give a smooth video recording. Your mileage will of course vary. You can leave it set at the default if you wish, since the wizard will try to figure out if your computer can cope with 60 fps.
For those who are not sure what FPS (frames per second) means, it is the rate at which the scenes of a video are shown. for example, an FPS of 30 means that 30 consecutive pictures are shown in one second. (Static pictures shown one after the other is how motion is mimicked on videos and films). You will probably have to be realistic about this. Although you may want a high frame rate so that your videos will appear super-smooth, your computer may not be able to cope with the workload of processing your video recording at the same time as running a game. Games demand a lot of your computer's resources. So does video encoding. Running both at the same time successfully requires a sufficiently powerful computer, so if you don't have a state-of-the-art desktop computer (but just, say, a standard laptop), you may have to scale down your expectations.
The wizard will then run a test to see what your system can actually handle, and display the results in the "Final Results" screen. When you click "Apply Settings", the program will change the configuration file to use these. Don't worry. You can modify these settings later if you want.
How to do a Video Recording of a Game
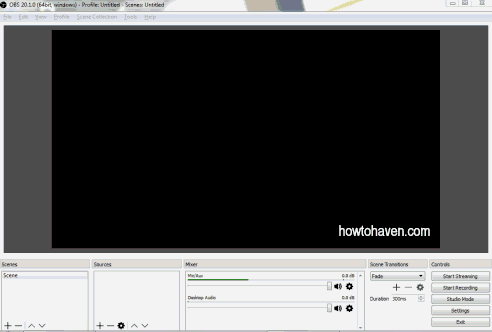
After the Auto-Configuration Wizard runs, you will be deposited at the main program window (see picture).

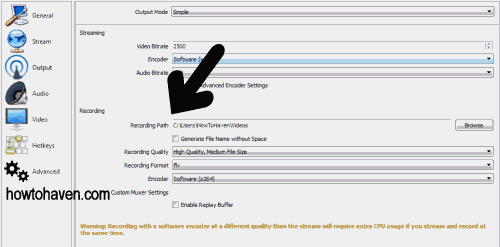
Click the "Settings" button at the bottom right of the main OBS window. The Settings dialog box will appear. Click the "Output" line on the left column of the dialog box. This causes all the settings pertaining to the output to appear on the right side.
Check the "Recording Path" field (see picture) and change it to a different location if you prefer your video to be saved somewhere other than the default location.

Another setting that you may want to change is the "Encoder" field. By default, it probably says "Software (x264)" or the like. Click the drop down box for that field. If you have options that mention NVENC (eg "Hardware (NVENC)") or Quicksync or AMF / AMD VCE, it means that your graphics adapter has built-in hardware facilities that OBS can take advantage of. For those wondering what this mysterious "encoding" is, as OBS records your video, it compresses it so that it doesn't occupy quite so much space. This process of compression is known as video encoding. Encoding video normally takes up a lot of your computer's resources, so some desktop graphics adapters provide specialized hardware to do it. The hardware takes over the workload that would otherwise by done by your computer's main processor.
If you have a normal (non-gaming) laptop, your graphics adapter is unlikely to have hardware encoding capabilities. As for desktop users, you may have to make sure your graphics card's drivers are up-to-date, otherwise OBS may not succeed in using the hardware facilities.
For the sake of completeness, I should probably mention that while the advantage of using hardware encoding is the reduced strain on your computer's resources, the disadvantage is that the video quality of the hardware encoding is supposedly lower than that of the software encoder, all other things being equal. But look at it this way. On weaker machines, the use of a hardware encoding may actually allow you to capture your games at a smooth frame rate, which you may otherwise not be able to.
Click the "Audio" line in the left column and check the settings there. If you are not using a microphone, you may want to make sure that the "Mic" fields are set to Disabled, leaving only the "Desktop Audio Device" set to Default. On my system, leaving the "Mic" field set to Default without a microphone actually connected to its port caused the audio in the output to be muffled.
You may also wish to click the "Video" line in the left column and check the settings that the Auto-Configuration Wizard created for you. You can change the resolution of your video by adjusting the "Output (Scaled) Resolution" field, and the frames per second from the FPS field ("Common FPS Values").
Start up your game. Do not close the OBS window; just leave it open while you start your game.
Wait for it to fully load then switch back to OBS.
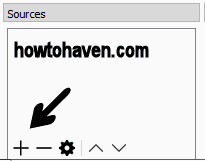
Click the "+" sign in the "Sources" box at the bottom of the OBS window (see picture).

A menu will pop up. Click the "Game Capture" line.
A dialog box with the title "Create/Select Source" will appear. Enter the name of your game (or whatever you want) in the "Create new" field and click "OK". This is a descriptive field, for your own information only, so it doesn't matter what you enter.
A new dialog box will appear. Click the drop-down box for "Mode". If your game runs fullscreen, select "Capture any fullscreen application". If it runs in a window, click "Capture specific window" to select it. If you select "Capture specific window", a new field called Window will appear. Click the drop-down box for that field and select the window containing your game. Click the "OK" button.
Your game should appear in the main window of OBS. If it doesn't, switch to your game's screen, wait a bit, then switch back to OBS. It should show up.
If you still see a black screen in the main window of OBS, and you are recording on a laptop, it may be because it has two graphics adapters. A number of modern laptops do this to prolong battery life. They provide a weaker integrated chip that the laptop uses when running normal programs, and switch to the more powerful (and power-hungry) discreet one when you run things like games. This leads to the situation where OBS is assigned the integrated adapter, while your game the other one. Since it's using a different adapter from your game, it cannot see what your game is drawing on the screen.
To solve this, please see the OBS forum's solution.
Click the "Start Recording" button, switch back to your game and play it. When you want to stop recording, return to the OBS window and click the "Stop Recording" button. That's it. The video file for your game can be found in the location you set earlier in the Recording Path.
Checking Your Video
If you want to view your video recording, you can use one of the many free media players around. Most, if not all, of them can play FLV and MP4 files (among other things) out-of-the-box.
Where to Go From Here
Here are some options of what to do next. Of course, everything depends on what you intended to do when you recorded your game.
Trim your game video so that it only contains the relevant scenes you want to show. You can do this with one of the many free video editing software around.
Get an account at a video sharing site and upload your video for others to enjoy.
Alternatively, you may want to make your own website, and host the video yourself. There are numerous free embedded video player scripts around that you can use, so that your visitors can watch your game playthrough directly on your web page.
Copyright © 2017-2020 by Christopher Heng. All rights reserved. Get more "How To" guides and tutorials from https://www.howtohaven.com/.
This article can be found at https://www.howtohaven.com/multimedia/how-to-record-a-game-video.shtml
howtohaven™ RSS Site Feed
Do you find this article useful? You can learn of new articles and scripts that are published on howtohaven.com by subscribing to the RSS feed. Simply point your RSS feed reader or a browser that supports RSS feeds at https://www.howtohaven.com/howtohaven.xml.
Please Do Not Reprint This Article
This article is copyrighted. Please do not reproduce this article in whole or part, in any form, without obtaining my written permission.
Related Pages
- Free Video Capture and Recording Software
- Free Video Converters or Transcoders: Convert Movies/Videos between Different Formats
- Free Lossless and Lossy Audio Encoders / Compressors
- Free Digital Audio / Sound Editors
- Free TV PVR (Personal Video Recorder) and TV Recording Software
- How to Register Your Own Domain Name
- Is it Possible to Create a Website Without Buying a Domain Name? The High Price of "Free".
- Expression Web Tutorial: How to Design a Website with the Free Microsoft Expression Web
Newest Pages
- Two Ways to View a Binary/Hexadecimal File on Windows Without Installing Anything
- How to Get the Hash (MD5, SHA1, SHA256, SHA512) of a File on Windows Without Installing Anything
- How to Solve the 0x80092004 Error When Installing a Windows 7 Security-Only/Monthly Update
- How to Create a Blog
- How to Record a Game Video
- How to Set Up a Standard User Account (or Limited Account) on Windows Vista and Windows 7 for Daily Use
- How to Securely Prepare Your Old Computer for Disposal
- How to Create / Start Your Own Website (Beginner's Guide)
How to Link to This Page
It will appear on your page as:
